Saturday, 28 November 2020

Blood Bowl Pitch Case Part 1

Many years ago, I saw a custom Blood Bowl pitch case online. Since then, I've always wanted to build one. I looked at others for inspiration, and decided upon this design. Here's how I designed and built the whole thing! 

I wanted the case to consist of two halves which sit flush against each other when closed. I decided the dugouts would be below the level of the pitch itself. 

A Blood Bowl pitch is made up of two halves, 16 squares wide by 13 squares long (including end zone). Each square is 34mm. This means each half of the pitch is 51cm by 44.2cm. I wanted the dugouts to be 2 squares wide, so the final size of each half of the pitch is 45.4cm by 66.2cm. This is to allow for the border around the edge of the case, which is made using 1/2 inch plywood. 


With all this in mind, I made each half using the following shapes of 1/2 inch plywood. I robbed my dad's electric circular saw for this (be very careful if you use one!), but I'm sure a jigsaw or even hand saw could work if you focus on getting accurate cuts. 

1x 66.2cm by 44.2cm rectangle - this is the "base" of each half - referred to as A
1x 66.2cm by 4.5cm rectangle. Referred to as B. This piece makes up the back border of each half of the case. 
1x 66.2cm by 3.3cm - referred to as C. This piece will go under the Line of Scrimmage. 
4x 44.2cm by 3.3cm rectangles. These create the border on the left and right of the case, as well as the edge of the pitch. Referred to as D 

This is the mess I had after all the parts were cut out!
This picture also shows a mess *ahem* a completed half of the case. All pieces are assembled using wood screws. 

Piece B is attached to the edge of A, forming the border of the case. This means it rises up 3.3cm over A. 

Piece C is attached on top of A. This will form the Line of Scrimmage for the case, and grass will go over it. It's very important not to mix up pieces B and C! 

The D pieces are all attached on top of A. Each pair is 68mm apart. The inner D pieces will go under the pitch. 

Phew, that was complicated! Once two halves were made in this way, I had this. 
At this point I decided to install the hardware. I recommend bolting a handle through part B at this point, as the hollow inside will soon be filled. I put latches between the two Bs. I added hinges between the two C pieces. 

This is the right time to fill any gaps between the parts. It is almost inevitable that there will be some errors in the cuts. I sanded away any imperfections. 

The next step is to build up the pitch itself. For this I used a scrap sheet of Kingspan foam (aka XPS, extruded polystyrene, blue foam, pink foam or whatever it's called!). This was glued to the A pieces using Gorilla Glue. The stuff I used was the wrong thickness, so I had to do a lot of cutting, sanding and cursing to get it down to 3.3cm in height. 

So that's it for the first part of the case! This is by far the most technical section of the build, and I hope my descriptions of all the different parts were OK. The next section is much more fun, as it involves furnishing the whole stadium! 


Thursday, 29 October 2020

Conall Beag


I just finished painting this miniature from Monkstone Miniatures. They're making a very interesting range of fantasy figures with a unique look. This one is "Rollo the Masterful", but Conall Beag (Conall the Little) is the name that came to me for him. 

I had a lot of fun experimenting with this colour scheme. Purple and turquoise are two of my favourite colours, but I haven't painted many figures with them. I imagine the scheme to be Conall's knightly heraldry. 


Saturday, 10 October 2020

Sebastopol Mortar (build)

 I've long wanted to build an Ethiopian army for Hordes of the Things. Recently, I've been doing some research into what such an army might look like. I ended up reading about "Sebastopol", a huge mortar commisioned by Tewodros II in the 1860s. 

The gun weighed 6.7 tons and could fire around half a ton of ammunition at a time! Although an indication of its power, Sebastopol's great weight was its undoing. As far as we know, it was never fired in battle. It was simply to heavy to be mobile. 


A contemporary illustration 

The barrel of the mortar today 


A replica Sebastopol, now on a roundabout in Addis Ababa

"Sebastopol" is a strange name. It refers to a city in Crimea, but I couldn't find any information as to why a mortar was given this name. Tewodros fought against the British, who had previously besieged Sebastopol. However, this was a British victory, so the name of the weapon probably wasn't ironic or insulting. 

This history is very inspiring, so I started thinking about how I would include it in my future army. It will be classed as Artillery, possibly as a General element for extra power. I imagine that as being Tewodros cheering on his creation! 

I remembered I had a 28mm scale mortar I got free with some Alternative Armies figures. I checked it for scale beside some 15mm figures and it was quite accurate to the size of Sebastopol, so the conversion work began! 


I added extra bands around the barrel using Milliput, then cut the base down into a square. 


I used some old matchsticks to make the undercarriage 


One thing became clear to me at this point :I needed wheels! This is a challenge, as spoked wheels are not easy to make from scratch. I just got a Snotling Blood Bowl team in the post today, and one part stood out to me. As you can see in the picture, the box contains spoked wheels. 
I wanted to copy this part using a Milliput mould. First, I covered the wheel in some talcum powder, then I pushed it into Milliput. The powder helped me to pull the wheel out again. Once the putty hardened, I had a perfect impression of the wheel! Using talcum powder and Milliput again, I stamped out copies of the wheel on old wet pallette paper (another material Milliput won't stick to). 

I'm really happy with how they turned out! But I had lots more to do before finishing the wheels. Two of Sebastopol's wheels are slightly wider than the others, so I had to use a different method. I gave sculpting them by hand a try. 

I used a paint bottle lid to stamp out a circle into epoxy putty, then hollowed out the middle with a sculpting tool. I carved some wood texture into the wheel. 

For the spokes, I took a toothpick and drilled evenly spaced holes around it with a pin vice. I used these to attach paper clip wire. Then I cut the wire down to size and glued the whole thing into the wheel. They took a long time to make, but I'm happy with them. 

I sanded down the backs of the wheels and glued them on. They're not as straight as I'd like, but I'm really happy with how the model turned out! I put it on a 40mm square base for Hordes of the Things. Lastly, I added two matchsticks on the carriage to be more accurate to Sebastopol's shape. 


I might add some chains around the wheels later, but for now the construction is done. I have a lot of other projects at the moment, but I'm looking forward to painting this one! 


Tuesday, 8 September 2020

The Silver Pinnacle Slayers

I painted this Dwarf Blood Bowl team back around the start of Lockdown, having wanted to start the game for years. I chose Dwarfs as my first team because they are very resilient players who are also well able to dish out damage!

I decided to go with NMM for the metal parts of the figures. I'm very happy with how it turned out. Apologies for the poor quality of the photos. 

A group shot of the whole squad!

My favourite players on the team are the Troll Slayers. These guys are very strong, and are able to hold their own against most other teams. Their main downside is their "Frenzy" special rule, which makes them recklessly pursue their opponents. 

I painted runic tattoos on both of them, although they might not al be visible in the photos. 


Two Blitzers:


The three different poses of Blockers (also referred to as Longbeards). 


Finally, two Runners. These are the "fast" players on the (notoriously slow) Dwarf team. They're great for running into the End Zone for a touchdown. 


I plan on painting up some Star Players and Secret Weapons for this team. Every Dwarf team needs a Deathroller sooner or later! 


Monday, 7 September 2020

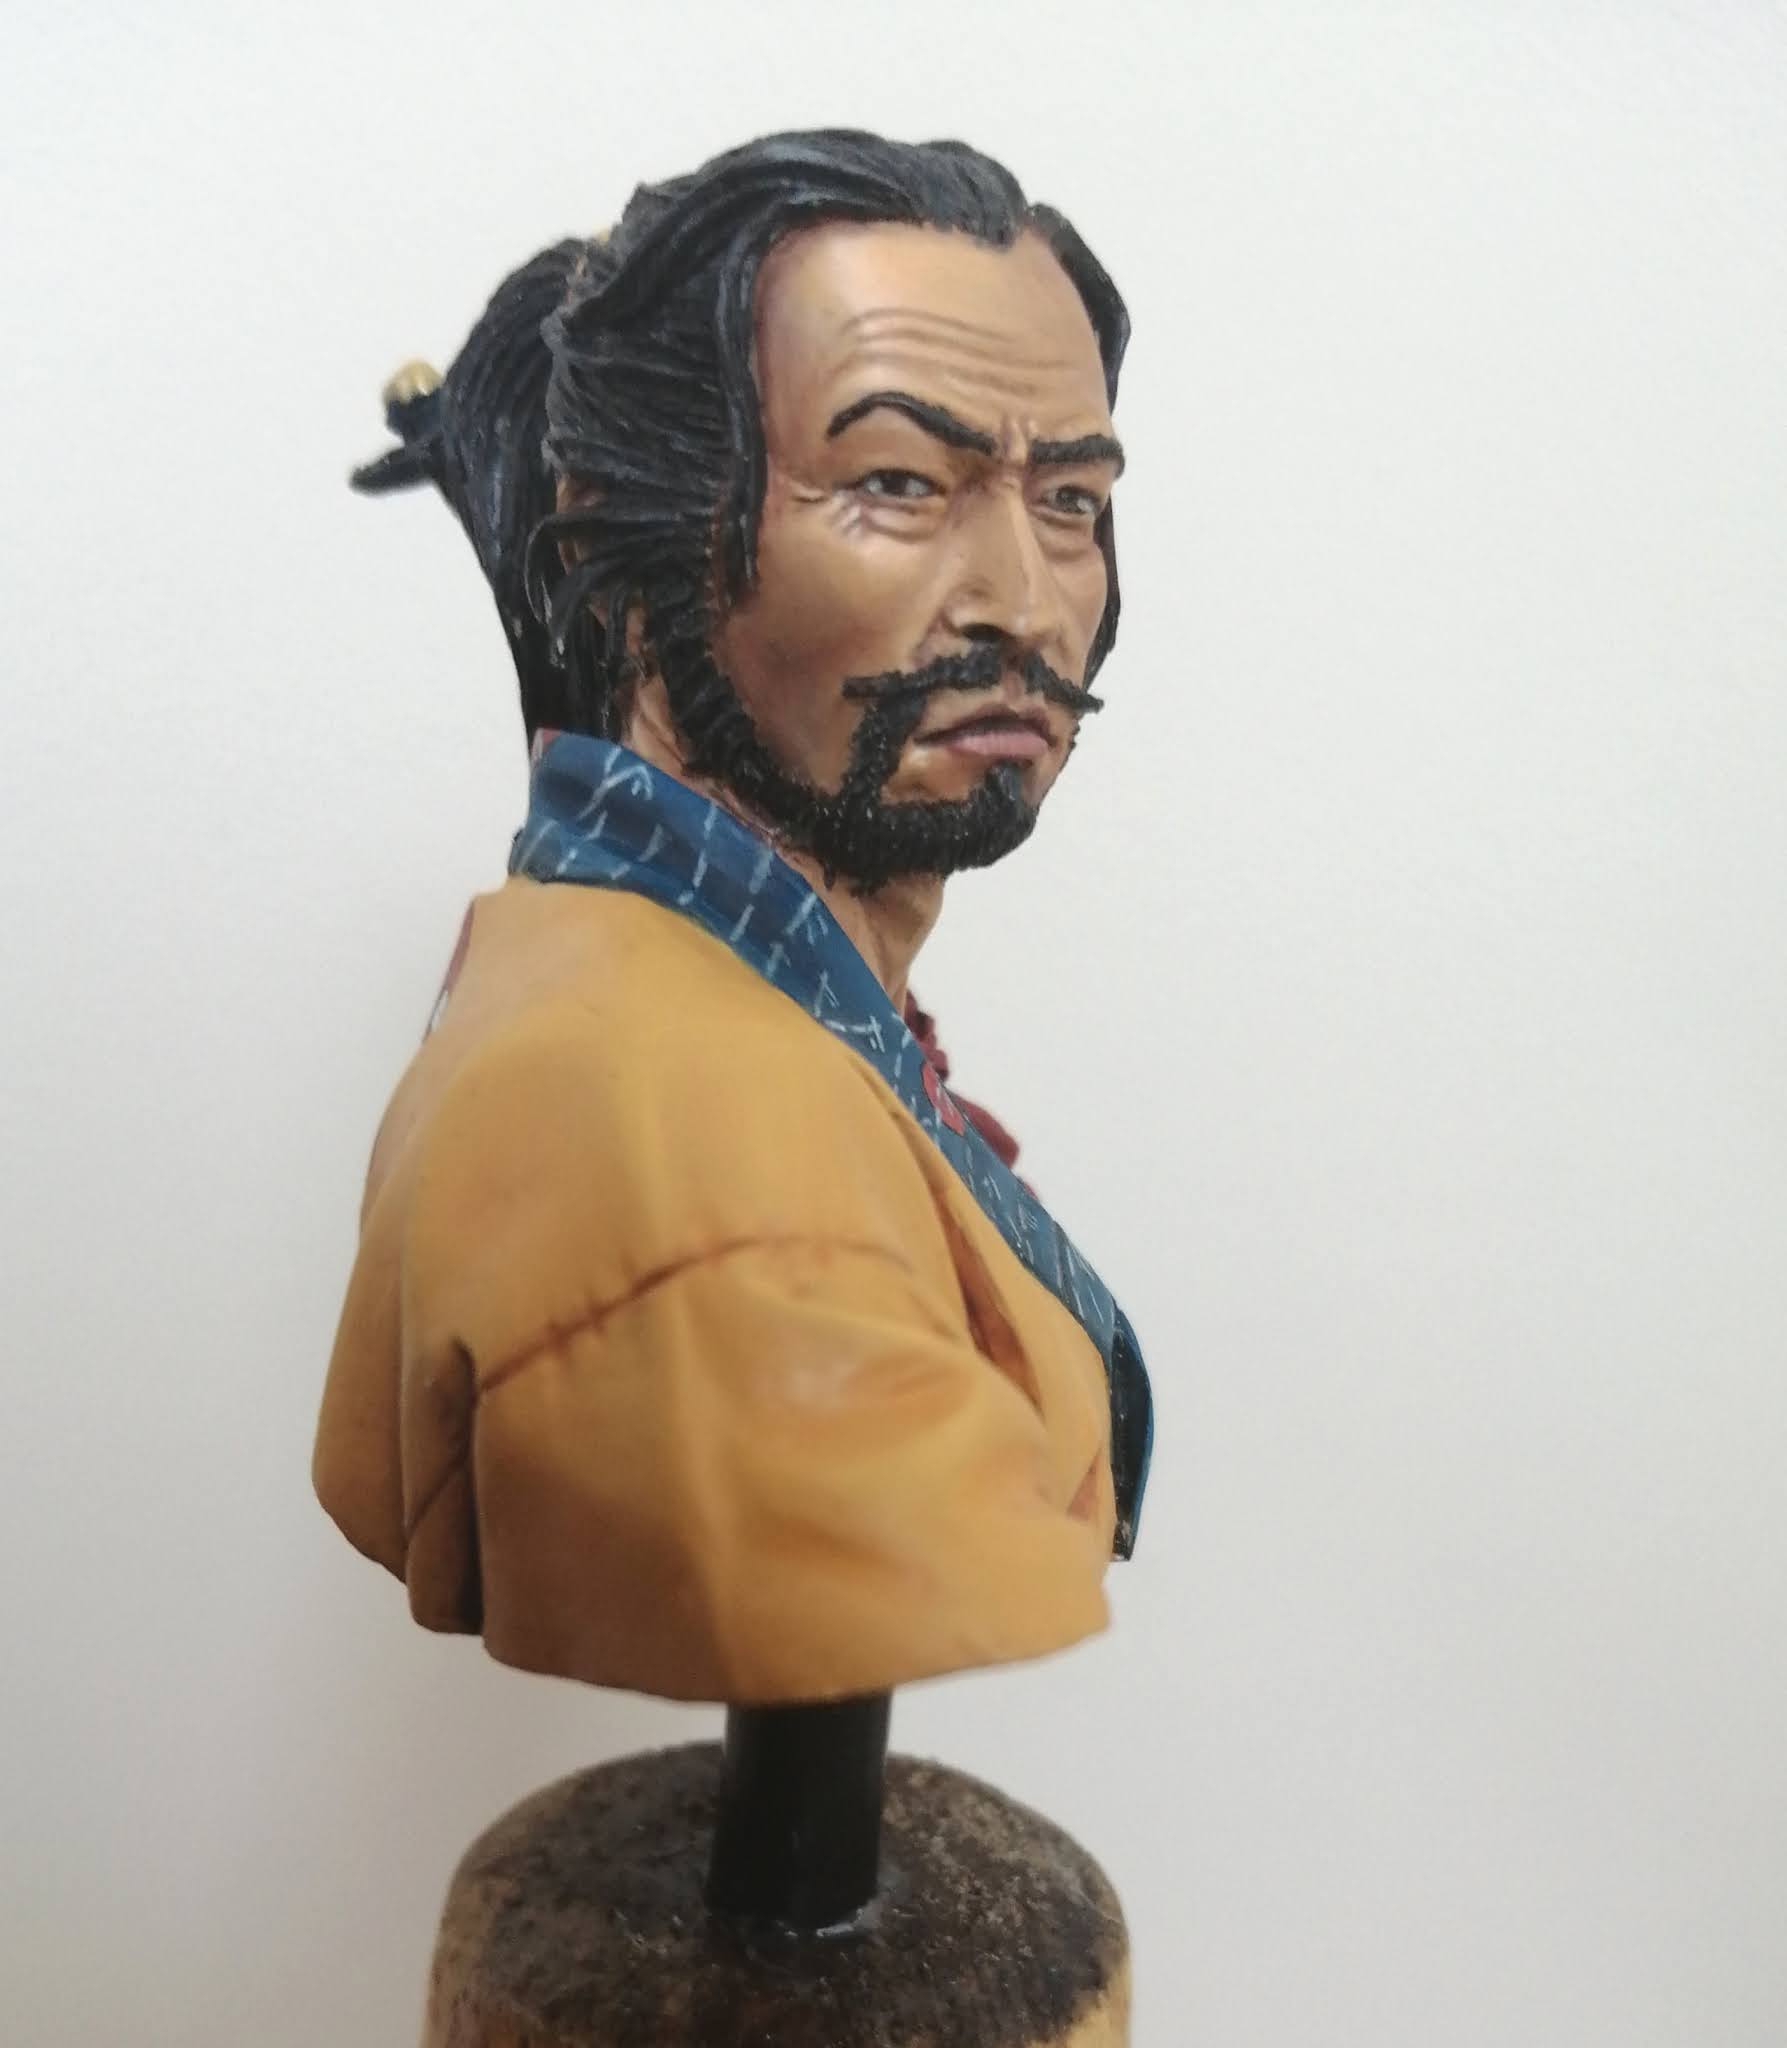
Pegaso Ronin Bust

 For my birthday this year, I got a very nice resin bust from Pegaso. Initially I wanted to paint him as Musashi Miyamoto, a samurai of almost legendary renown. I decided against this later on, instead employing a style inspired by the music of Shing02 and artwork from Samurai Champloo.


I tried out some new techniques on this figure. I wanted to create a "Rembrandt lighting" effect. This means that half the face is hit by light, while the other side is in shadow. I'm happy with the result, but I think I should have increased the contrast between the light and dark areas. 

The pattern on the collar represents a bamboo forest under a rising sun, and is repeated around the figure. 


The image on his back was painted in a cartoon style, inspired by the visuals of Samurai Champloo. 


The Averland Adventurers

 These little folk are my new Halfling Blood Bowl team. They're great sculpts with a lot of charm. I did a few conversions on some of the players to make them more unique, and to allow me to use Star Players. Their kit is inspired by FC Barca's Catalan shirt. 

Here's a group photo of the whole squad! 


These two are Hefties, particularly tough Halflings. I like their design, both of them look like they're seasoned fighters (even if they're not exactly great!). I sculpted a scarf for the one on the right and gave him an extra shoulder spike so that he can be used as Puggy Baconbreath. 


These two Hopefuls are posed sprinting up the field. As with all the figures on the team, I really enjoyed painting their faces.


I made stilts for this player. He can be used as a normal Hopeful or as the Star Player Nuddley Verruca. 


This fella looks confident, as if he could be the team captain. 


Two Catchers:


I did a head swap on this Hopeful to make him suitable for Captain Colander. I sculpted a cape for him from Milliput too. Painting chequered clothing is always a challenge, but fun. 


This is another converted Hopeful. I combined two heads from the kit and sculpted some curly hair. He can be used as a standard Hopeful or Big Jobo. 


A fairly normal Hopeful :


Player number 6 is one of my favourites. 


No Halfling team is complete without some Treemen, and I'd like to add some soon. I'm not sure which miniatures I'll use for them, but I might try the Treemen from the Warlords of Erehwon range. The box includes 3 different sculpts, so it's perfect for a Halfling team. 


Monday, 31 August 2020

Kilkenny Witch Trial Chess Set Part 2 : the White Pieces

The Complete Side


 The pawns

These pieces are intentionally nondescript. They represent the many supporters of Bishop Ledrede. 


The Rooks

The rooks are inspired by the round tower at St. Canice's Cathedral. 

The Knights

These represent the agents of the Bishop. 


The Bishops

Since the King on this side has to represent a Bishop, these were made to represent monks. Their design is inspired by the monks' tonsure


The Queen

I found this piece to be the hardest to design. I thought it should represent an ally or second-in-command of the bishop. I decided to carve a person wearing a generic 14th Century hat. The figure represents the children of Alice Kyteler who accused her of several crimes. 


The King

The mighty Bishop Ledrede himself. He was fanatical in his pursuit of Alice and her "witchcraft" 


A picture of the complete set: